Welcome to my step-by-step guide on how to build your own digital ticket for the Apple Wallet. Today, I’m going to show you how to set up a backend system and create an app with SwiftUI that lets you store and use tickets right on your iPhone.
We’re going to turn the Klimaticket, a yearly public transport ticket in Austria, into a ticket on your phone. This will make your travels simpler and help the planet too.
By the time you finish this guide, you’ll learn how to create digital passes for your wallet on your iPhone.
Preparations
Info
Github-Link: WalletPass
- Create the server folder and initialize it
mkdir server && cd server && npm init -y
- Next, we can add Fastify with
npm i fastify
- We will use https://github.com/alexandercerutti/passkit-generator:
add it to your server dependencies by running this command while in the
./serverdirectory.
npm i passkit-generator
- install openssl
Mac (Homebrew)
brew install openssl
Linux
sudo apt install openssl
- create a cert folder (
/server/cert)
mkdir cert
Create the Certificates
-
Create a new pass type identifier (direct link) and provide it with a description and a reverse-domain identifier (starting with “pass.”). You will have to put this identifier as a value for
passTypeIdentifierin thepass.jsonfile or as a prop. -
Confirm and register the new identifier.
-
In the list of your passTypeIds (filter), click on your new pass id to edit it.
-
Click on “Create Certificate”.
-
To provide Apple with the required Certificate Signing Request, we’ll have first to generate a private key. This will be your signerKey. Having it as
.keyor.pemdoesn’t make any difference: it is still a PEM.
# If you want to set it as a passphrase, add "-passout pass:<your-passphrase>" before "2048".
# If you follow the passphrase way, you'll have to set a "-passin pass:<your-passphrase>" (or insert it manually)
# in the next commands and, once done, set it to passkit-generator at `signerKeyPassphrase`.

$ openssl genrsa -out signerKey.key 2048
- Generate a CSR using your private key. Usually, the final file should have a
.csrextension, but there is no difference:.csris an ASN.1 Base64 encoded text. Therefore it can have any extension you want. You’ll be prompted to insert a few pieces of information one per prompt. Continue reading.
$ openssl req -new -key signerKey.key -out request.certSigningRequest
In the required information, you’ll have to insert Apple CA’s information, like below (those among asterisks). If none, press Enter to skip. After the email address, you won’t need any further information. So press Enter until you won’t finish.
Country Name (2-letter code) [AU]: US
State or Province Name [Some-State]: United States
Locality Name []:
Organization Name [Internet Widgits Pty Ltd]: Apple Inc.
Organizational Unit Name []: Apple Worldwide Developer Relations
Common Name []: Apple Worldwide Developer Relations Certification Authority
Email Address []: your-email
-
Take the generated file
request.certSigningRequestand upload it to the provisioning portal at step 4. Once processed, you’ll be able to download a certificate likepass.cer -
Once downloaded the certificate, you’ll have to convert it to
.pem(from a DER-encoded to PEM Base64 encoded). Save the result somewhere safe. You’ll be using it in your application assignerCert.
# .cer to .pem
$ openssl x509 -inform DER -outform PEM -in signerCert.cer -out signerCert.pem
- Go to this website: Apple PKI and download the certificate called Worldwide Developer Relations - G4
- Take the WWDR Certificate and convert it to a
.pembase64.
# .cer to .pem
$ openssl x509 -inform DER -outform PEM -in <cert name>.cer -out wwdr.pem
- Copy the 3 certificates to the folder
/server/cert
signerCert.pemsignerKey.keywwdr.pem
And you are done with the certificates. 🎉 Now get back and try to create your first pass!
Create a model
You can either create a said model manually by following the official guidelines from Apple or just use a visual tool like Passkit Visual Designer provided by the authors of the Passkit Generator.
Or use the file I provide in my Github-Repo: Transit.pass
Put the Model-Pass in the server folder like this:
/server/<modelName>.pass/
In my case:
/server/transit.pass/
Warning
Please keep in mind that even if you are using the example model folder from the repository, you need to edit pass.json to replace passTypeIdentifier and teamIdentifier with your own values matching those from your signing certificate. If you don’t do this then you won’t be able to sign the passes properly.
Setup the Server
Finally, we are ready to generate our first Apple Wallet pass.
Let’s open ./server/index.js and add a new POST endpoint looking like this:
const path = require('path');
const fs = require('fs');
const crypto = require('crypto');
const fastify = require('fastify')(
	{
	  logger: true,
	  bodyLimit: 15 * 1048576,
	}
);
const { PKPass } = require('passkit-generator');

// Certificates
const certDirectory = path.resolve(process.cwd(), 'cert');
const wwdr = fs.readFileSync(path.join(certDirectory, 'wwdr.pem'));
const signerCert = fs.readFileSync(path.join(certDirectory, 'signerCert.pem'));
const signerKey = fs.readFileSync(path.join(certDirectory, 'signerKey.key'));

// Input Fields
fastify.post('/', async (request, reply) => {
  const {
    name,
    cardNr,
    dateFrom,
    dateTo,
    dateBirth,
    type
  } = request.body;

  const passID = crypto.createHash('md5').update(`${name}_${Date.now()}`).digest('hex')


// Generate the pass
const pass = await PKPass.from(
  {
	// Path to your pass model directory
    model: path.resolve(process.cwd(), 'transit.pass'),
    certificates: {
      wwdr,
      signerCert,
      signerKey,
    },
  },
  {
    serialNumber: passID,
  },
);

// Expiration Format
const [day, month, year] = dateTo.split('.');
const date = new Date(`${year}-${month}-${day}T23:59:00+01:00`);

// Expiration Date
pass.setExpirationDate(date);

// headerFields
pass.headerFields.push(
    {
      key: 'type',
      value: type
    }
);

// primaryFields
pass.primaryFields.push(
	{
	  key: 'name',
	  value: name
	}
);

// secondaryFields
pass.secondaryFields.push(
	{
	  key: 'cardNr',
	  label: "Kartennummer",
	  value: cardNr
	},
	{
	  key: 'dateTo',
	  label: "Ablaufdatum",
	  value: dateTo
	},
);

// auxiliaryFields
pass.auxiliaryFields.push(
    {
      key: 'dateBirth',
      label: "Geburtsdatum",
      value: dateBirth
    },
    {
      key: 'dateFrom',
      label: "Beginn",
      value: dateFrom
    }
);

reply.header('Content-Type', 'application/vnd-apple.pkpass');
reply.send(pass.getAsBuffer());
});

// Start the server
fastify.listen({ port: process.env.PORT ?? 3000, host: '0.0.0.0' }, function (err) {
  if (err) {
    fastify.log.error(err);
    process.exit(1);
  }
  fastify.log.info(`Server listening on ${fastify.server.address().port}`);
});
Let’s test it: from the ./server folder, run node index.js.
You should get a confirmation that your server is running at http://localhost:3000.
The next step involves using Postman, curl, or any other tool that will let you make a POST request to http://localhost:3000.
Use this as the request body:
{
    "name": "John Smith"
    "cardNr": "1234",
    "dateFrom": "01.01.2020",
    "dateTo": "12.12.2025",
    "dateBirth": "01.01.1999",
    "type": "Classic"
}
If all is done right, you should receive back a binary file that you can save under a name with a .pkpass extension, which will allow you to preview the pass with Pass Viewer built-in into MacOS.
Add an Image and use an Aztec Code
Info
You can find the complete code here: Github: index.js
Change this part of the code to include aztecCode and image
fastify.post('/', async (request, reply) => {
  const {
    name,
    cardNr,
    dateFrom,
    dateTo,
    dateBirth,
    aztecCode,
    type,
    image
  } = request.body;
Also add this Code to add them to the pass.
// MARK: add Infos to the pass
// Barcode Type
const barcode = {
  format: "PKBarcodeFormatAztec",
  message: aztecCode,
  messageEncoding: "iso-8859-1"
};

// Barcode Data
pass.setBarcodes(barcode);

// Add a Image to the pass
// Decode the image from Base64 and save or use it directly
const imageBuffer = Buffer.from(image, "base64");

// Now you can use the image in your PKPass
pass.addBuffer("thumbnail.png", imageBuffer);
pass.addBuffer("thumbnail@2x.png", imageBuffer);
Create the App
- Create a Model to Pass Data
class FormData: ObservableObject {
    @Published var fullName: String = ""
    @Published var cardNr: String = ""
    @Published var dateFrom: String = ""
    @Published var dateTo: String = ""
    @Published var dateBirth: String = ""
    @Published var type: String = "Classic"
    @Published var aztecCode: String = ""
    @Published var imgBase64: String = ""

    var isComplete: Bool {
        return !fullName.isEmpty && !cardNr.isEmpty && !dateFrom.isEmpty && !dateTo.isEmpty && !dateBirth.isEmpty && !type.isEmpty && !aztecCode.isEmpty && !imgBase64.isEmpty
    }
}
- Create the View for the user input
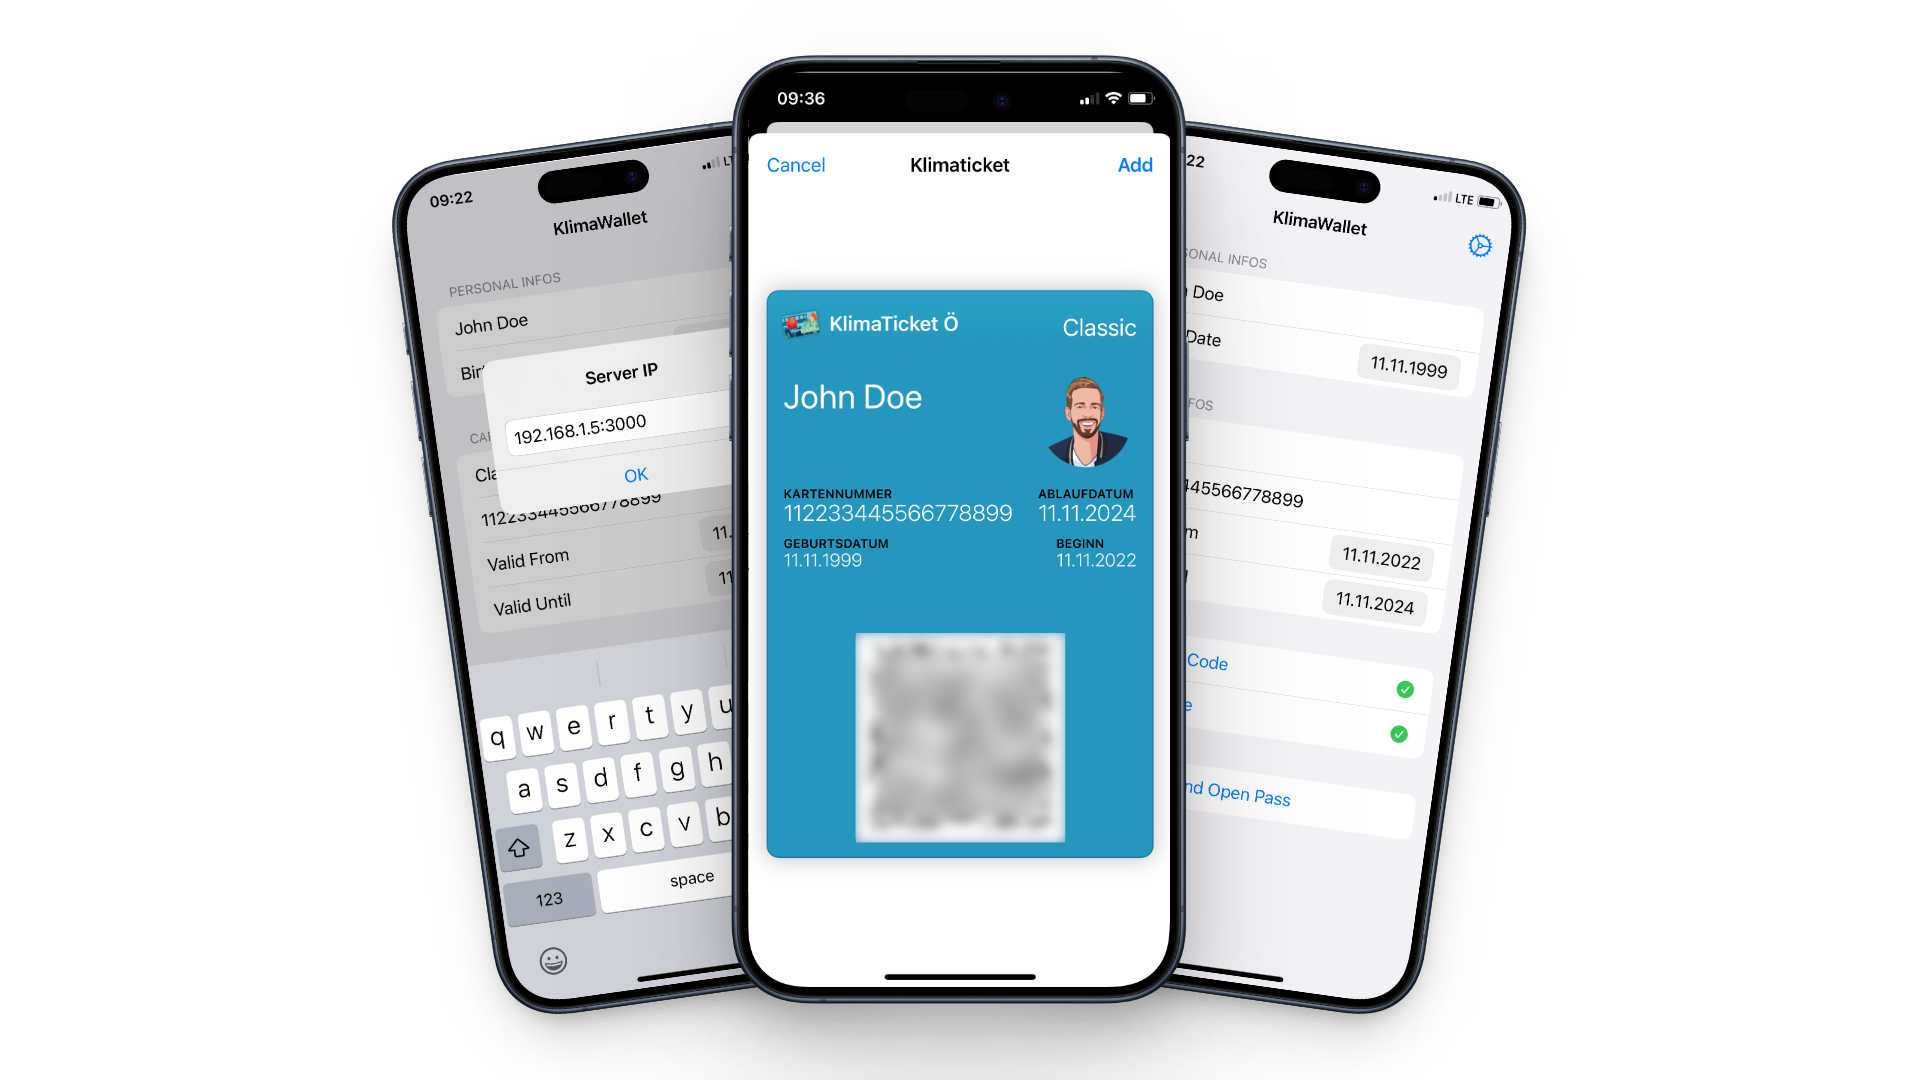
The provided code snippet is for an iOS app’s user interface where you fill out a form with personal and card details to get a digital pass. Here’s how it works, in simple terms:
- You enter your name, birthdate, card type, and card number.
- You can also pick dates for when the card starts and ends.
- The app has a “Scan Code” button. When you tap it, it uses the “CodeScanner” dependency to scan a code, like the barcode on your card.
- You can also add a picture by choosing one from your photos.
- Once all your info is complete, you tap “Fetch and Open Pass,” and the app sends your info to a server. Then it gets back a digital pass, which looks like a little card in your app’s wallet.
- If you tap the settings icon, you can change the server’s IP address.
If something doesn’t work right, the app will show you an error message so you know what went wrong.
import SwiftUI
import PhotosUI
import PassKit
import CodeScanner

struct ContentView: View {

    @StateObject private var formData = FormData()

    @State private var isLoading: Bool = false

    @State private var pass: PKPass?
    @State private var showPassView: Bool = false
    @State private var showScanner: Bool = false
    @State private var showError: Bool = false
    @State private var showSetting = false
    @State private var errorText: String = "An error occurred while importing the pass."
    @State private var serverIP = "services.it-lueg.at:3000"

    @State private var dateFrom: Date = Date()
    @State private var dateTo: Date = Date()
    @State private var dateBirth: Date = Date()

    private var dateFormatter: DateFormatter {
        let formatter = DateFormatter()
        formatter.dateFormat = "dd.MM.yyyy"
        return formatter
    }


    @State private var avatarItem: PhotosPickerItem?
    @State private var avatarImage: Image?


    var body: some View {
        NavigationStack {
            Form {
                Section {
                    TextField("Full Name", text: $formData.fullName)
                    DatePicker("Birth Date", selection: $dateBirth, displayedComponents: .date)
                        .onChange(of: dateBirth) { newDate in
                            formData.dateBirth = dateFormatter.string(from: newDate)
                        }
                } header: {
                    Text("Personal Infos")
                }

                Section {
                    TextField("Type", text: $formData.type)
                    TextField("Card Number", text: $formData.cardNr)
                    DatePicker("Valid From", selection: $dateFrom, displayedComponents: .date)
                        .onChange(of: dateFrom) { newDate in
                            formData.dateFrom = dateFormatter.string(from: newDate)
                        }
                    DatePicker("Valid Until", selection: $dateTo, displayedComponents: .date)
                        .onChange(of: dateTo) { newDate in
                            formData.dateTo = dateFormatter.string(from: newDate)
                        }
                } header: {
                    Text("Card Infos")
                }

                Section {
                    Button(action: {
                        showScanner.toggle()
                    }, label: {
                        Label {
                            HStack {
                                Text("Scan Code")
                                Spacer()
                                if formData.aztecCode != "" {
                                    Image(systemName: "checkmark.circle.fill")
                                        .foregroundStyle(.green)
                                }
                            }
                        } icon: {
                            Image(systemName: "qrcode")
                        }
                    })


                    PhotosPicker(selection: $avatarItem, matching: .images, label: {
                        Label {
                            HStack {
                                Text("Picture")
                                Spacer()
                                if formData.imgBase64 != "" {
                                    Image(systemName: "checkmark.circle.fill")
                                        .foregroundStyle(.green)
                                }
                            }
                        } icon: {
                            Image(systemName: "face.smiling")
                        }
                    })
                }

                Section {
                    Button(action: {
                        postAndPreviewPass()
                    }) {
                        Label {
                            HStack {
                                Text("Fetch and Open Pass")
                                Spacer()
                                if isLoading {
                                    ProgressView()
                                }
                            }
                        } icon: {
                            Image(systemName: "wallet.pass.fill")
                                .foregroundStyle(formData.isComplete ? .blue : .gray.opacity(0.5))
                        }
                    }
                    .disabled(!formData.isComplete)
                }
            }
            .onChange(of: avatarItem) { _ in
                Task {
                    if let data = try? await avatarItem?.loadTransferable(type: Data.self) {
                        if let uiImage = UIImage(data: data) {
                            // Determine the dimensions of the original image
                            let originalSize = uiImage.size
                            let minDimension = min(originalSize.width, originalSize.height)

                            // Calculate the cropping rectangle
                            let croppingRect = CGRect(x: (originalSize.width - minDimension) / 2,
                                                      y: (originalSize.height - minDimension) / 2,
                                                      width: minDimension,
                                                      height: minDimension)

                            // Crop the image to a square
                            let croppedImage = uiImage.cropping(to: croppingRect)

                            // Proceed with your existing code...
                            let maxDimension: CGFloat = 300 // Set the maximum dimension you want
                            let scaledImage = croppedImage!.scaledDown(to: maxDimension)

                            // Create a new image context
                            UIGraphicsBeginImageContextWithOptions(scaledImage.size, false, 0.0)
                            defer { UIGraphicsEndImageContext() }

                            // Create a path that is a circle
                            let path = UIBezierPath(ovalIn: CGRect(origin: .zero, size: scaledImage.size))
                            path.addClip()

                            // Draw the image in the current context
                            scaledImage.draw(in: CGRect(origin: .zero, size: scaledImage.size))

                            // Get the clipped image
                            let clippedImage = UIGraphicsGetImageFromCurrentImageContext()

                            // Convert the clipped image to Data, then to Base64
                            formData.imgBase64 = clippedImage?.pngData()?.base64EncodedString() ?? ""
                            print(formData.imgBase64)
                            return
                        }
                    }
                    print("Failed")
                }
            }

            .sheet(isPresented: $showPassView) {
                AddPassView(pass: $pass)
            }
            .sheet(isPresented: $showScanner) {
                CodeScannerView(codeTypes: [.aztec], showViewfinder: true, simulatedData: "Paul Hudson") { response in
                    switch response {
                    case .success(let result):
                        formData.aztecCode = result.string
                        print("Found code: \(result.string)")
                        showScanner.toggle()
                    case .failure(let error):
                        print(error.localizedDescription)
                    }
                }
                .ignoresSafeArea()
                .presentationDetents([.medium])
            }
            .alert(isPresented: $showError) {
                Alert(title: Text("Error"), message: Text(errorText), dismissButton: .default(Text("OK")))
            }
            .alert("Server IP", isPresented: $showSetting) {
                TextField("Name", text: $serverIP)
            }
            .navigationTitle("KlimaWallet")
            .toolbar {
                ToolbarItem(placement: .topBarTrailing) {
                    Button(action: {
                        showSetting.toggle()
                    }, label: {
                        Image(systemName: "gear")
                    })
                }
            }
        }
    }
}
- Add a function to send the data to the server, receive a pass, create the .pkpass file and show it to the user
The
postAndPreviewPass()method is sending the information to a server and then turning that into a digital pass, like a movie ticket or boarding pass, that you can see in the app. First, it shows a spinner to let you know it’s working. Then, it sends off the details and waits for a reply. If all goes well, it saves this info as a special pass file. After that, the app tries to turn this file into a digital pass you can actually use. If there’s a problem at any step, the app will show an error message instead. This makes it super easy to get and use passes without leaving the app.
    func postAndPreviewPass() {
        isLoading = true

        // Replace this URL with your own
        guard let url = URL(string: "http://\(serverIP)") else {
            print("Invalid URL")
            return
        }

        var request = URLRequest(url: url)
        request.httpMethod = "POST"
        request.addValue("application/json", forHTTPHeaderField: "Content-Type")

        let payload: [String: Any] = [
            "name": formData.fullName,
            "cardNr": formData.cardNr,
            "dateFrom": formData.dateFrom,
            "dateTo": formData.dateTo,
            "dateBirth": formData.dateBirth,
            "aztecCode": formData.aztecCode,
            "type": formData.type,
            "image" : formData.imgBase64
        ]

        do {
            request.httpBody = try JSONSerialization.data(withJSONObject: payload, options: [])

            let task = URLSession.shared.dataTask(with: request) { (data, _, error) in
                defer { self.isLoading = false }
                guard let data = data, error == nil else {
                    print("Request failed: \(error?.localizedDescription ?? "No data")")
                    return
                }

                print("Received data from server: \(data)")

                if let dir = FileManager.default.urls(for: .documentDirectory, in: .userDomainMask).first {
                    let fileURL = dir.appendingPathComponent("file.pkpass")

                    do {
                        try data.write(to: fileURL, options: .atomic)
                        print("pkpass file saved")

                        let passData = try Data(contentsOf: fileURL)
                        print("Read \(passData.count) bytes from saved file")

                        do {
                            let pass = try PKPass(data: passData)
                            print("Created PKPass object")
                            DispatchQueue.main.asyncAfter(deadline: .now() + 0.5) {
                                self.pass = pass
                                self.showPassView = true
                            }
                        } catch {
                            print("Error creating PKPass object: \(error)")
                            DispatchQueue.main.async {
                                self.errorText = "Error creating PKPass object: \(error)"
                                self.showError = true
                            }
                        }
                    } catch {
                        print("An error occurred: \(error)")
                        DispatchQueue.main.async {
                            self.errorText = "An error occurred: \(error)"
                            self.showError = true
                        }
                    }

                }
            }

            task.resume()

        } catch {
            print("Failed to serialize JSON: \(error)")
            DispatchQueue.main.async {
                self.errorText = "Failed to serialize JSON: \(error)"
                self.showError = true
            }
        }
    }
- We also need extensions to
UIImageto scale and crop the image
extension UIImage {
    /// Scales the image to a maximum dimension (width or height).
    func scaledDown(to maxDimension: CGFloat) -> UIImage {
        let aspectRatio: CGFloat = min(maxDimension / size.width, maxDimension / size.height)
        let newSize = CGSize(width: size.width * aspectRatio, height: size.height * aspectRatio)
        let renderer = UIGraphicsImageRenderer(size: newSize)

        return renderer.image { context in
            self.draw(in: CGRect(origin: .zero, size: newSize))
        }
    }

    func cropping(to rect: CGRect) -> UIImage? {
            guard let cgImage = self.cgImage?.cropping(to: rect) else { return nil }
            return UIImage(cgImage: cgImage, scale: self.scale, orientation: self.imageOrientation)
        }
}
- The
AddPassViewstruct is the final step in Swift that presents a view for users to add a digital pass to their Apple Wallet using thePKAddPassesViewControllerfrom the PassKit framework.
import Foundation
import PassKit
import SwiftUI
import UIKit

struct AddPassView: UIViewControllerRepresentable {

    typealias UIViewControllerType = PKAddPassesViewController

    @Environment (\.presentationMode) var presentationMode

    @Binding var pass: PKPass?

    func makeUIViewController(context: Context) -> PKAddPassesViewController {
        let passVC = PKAddPassesViewController(pass: self.pass!)
        return passVC!
    }

    func updateUIViewController(_ uiViewController: PKAddPassesViewController, context: Context) {
        // Nothing goes here
    }
}