Integrating a WiFi setup with a captive portal into your ESP32 projects significantly enhances the user experience by simplifying the network connection process. This tutorial will guide you through setting up your ESP32 project with a captive portal using PlatformIO in Visual Studio Code (VSCode) and incorporating the WiFiManager library.
Setting up PlatformIO in VSCode
PlatformIO is an open-source ecosystem for IoT development. It supports a vast number of boards and frameworks, including ESP32. To integrate PlatformIO with VSCode:
- Install VSCode: Download and install Visual Studio Code from its official website.
- Install the PlatformIO Extension: Open VSCode, go to the Extensions view by clicking on the square icon on the sidebar, or pressing
Ctrl+Shift+X. Search for “PlatformIO IDE” and install it. - Restart VSCode: Once installed, restart VSCode to complete the setup.
Initializing Your Project with PlatformIO
After setting up PlatformIO, create a new project:
- Open PlatformIO Home by clicking on the PlatformIO icon in the sidebar.
- Click on “New Project”.
- Enter a name for your project, select “Espressif ESP32 Dev Module” as the board, and choose your preferred framework (e.g., Arduino).
- Click “Finish” to create the project.
Adding WiFiManager Dependency
With your project set up, you need to include the WiFiManager library, which facilitates the WiFi connection and captive portal functionality. To do this, add the following line to your platformio.ini file:
lib_deps =
    https://github.com/tzapu/WiFiManager.git
This line tells PlatformIO to download and include the WiFiManager library from the specified GitHub repository in your project.
Implementing WiFi Setup with Captive Portal
The WiFiManager library simplifies the WiFi connection process by automatically connecting to known networks or launching a captive portal when the device can’t connect to any known network. Below is an example code snippet on how to implement this:
#include <WiFiManager.h>

void setup() {
  Serial.begin(9600);

  // Initializes WiFiManager
  WiFiManager wifiManager;

  // Tries to connect to the last known network.
  // Launches a captive portal if the connection fails or the timeout is reached.
  if(!wifiManager.autoConnect("ESP32_AP")) {
      Serial.println("Failed to connect to WiFi. Please restart.");
      ESP.restart();
  }

  // If you reach this point, you have successfully connected to a network.
  Serial.println("Connected to WiFi!");
}

void loop() {
  // Your repeated code goes here.
}
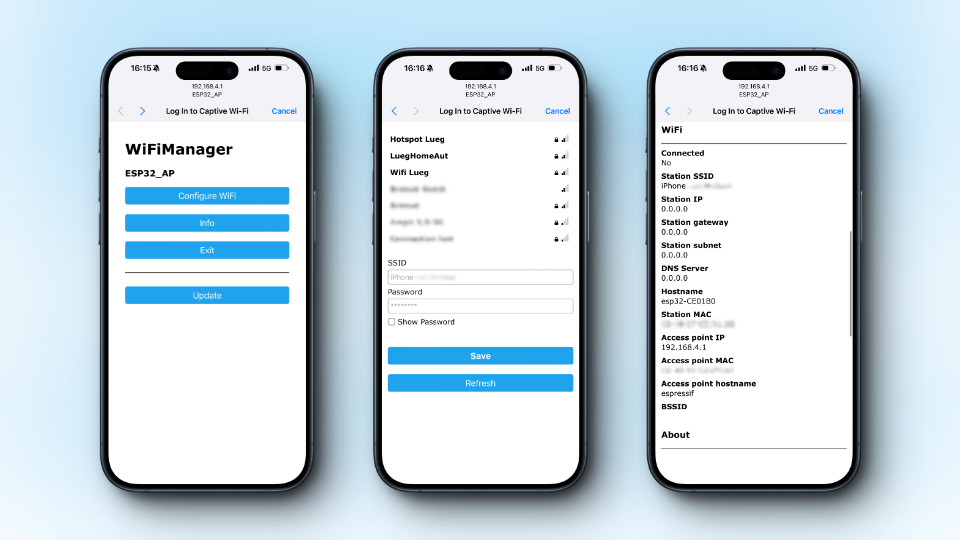
This code automatically attempts to connect the ESP32 to a previously connected WiFi network. If it fails or no known network is available, it launches a captive portal named “ESP32_AP.” The user can connect to this network and select a WiFi network for the ESP32 to connect to.
Configuration Options
In addition to the basic setup, the WiFiManager library provides several options to customize the behavior of the captive portal and WiFi connection process to suit your project needs. Here are some of the configurable options:
Portal timout
// Sets the AP timeout to 120 seconds. The ESP restarts after 120 seconds without a connection.
wifiManager.setConfigPortalTimeout(120);
Only show some buttons
// Remove all buttons except the wifi config and exit
std::vector<const char *> wm_menu  = {"wifi", "exit"};
wifiManager.setMenu(wm_menu);
Erase saved wifi credentials
// Erasing the WiFi settings
Serial.println("Resetting");
wifiManager.resetSettings();
ESP.restart();
Final Steps and Testing
After implementing the code, compile and upload it to your ESP32. To test the captive portal functionality, ensure the ESP32 isn’t connected to any known networks. It should broadcast an SSID named “ESP32_AP.” Connect to this network using a smartphone or computer, and a captive portal should appear, prompting you to select a WiFi network and enter the password for the ESP32 to connect to.
By following this guide, you’ve successfully integrated a WiFi setup with a captive portal into your ESP32 project, enhancing its accessibility and user-friendliness.